Creating an event on EventCart is easy, quick and free. After signing in with your verified EventCart account, Locate and click on “CREATE AN EVENT” at the top right corner of your EventCart Page. In just 3 easy steps you can GO live and start selling immediately
Step 1: Basic Details
Here you may enter the following.
Event name or title (Keep it short and simple for your guests to remember with ease)
Select event category (A category for your event so your customers can easily search for your event)
Choose event tags (Some event tags making it easy for search engines to locate the event and publically market it)
Summarize your event (A small summary for your event which can be seen also in event search on EventCart)
Upload a suitable picture (A catchy picture to personalize your event)
Describe your event (Details about your event. Give as much information as you like, with our powerful editor you can customize the information also)
Provide the address for the event. (A venue for your attendees so that they can easily find the place)
Once done please click "Save and Continue" to move to step 2
Step 2 : Event Schedule
Here you decide your event timetable. You may let your attendees know the timetable of your event also. With our rich text editor you can customize your timetable also. Please enter the following things in order to proceed.
Select a timezone (Please make sure you selected the correct timezone)
Enter start and end date & time
Provide your event schedule (Let your guests know about your event)
Once done please click "Save and Continue" to move to step 3
Step 3 : Event Ticketing
EventCart allow you to create different tickets for just a single event. This great and effective feature will enable you to create different ticket value for different attendees of your event. This can be done by following the steps below:
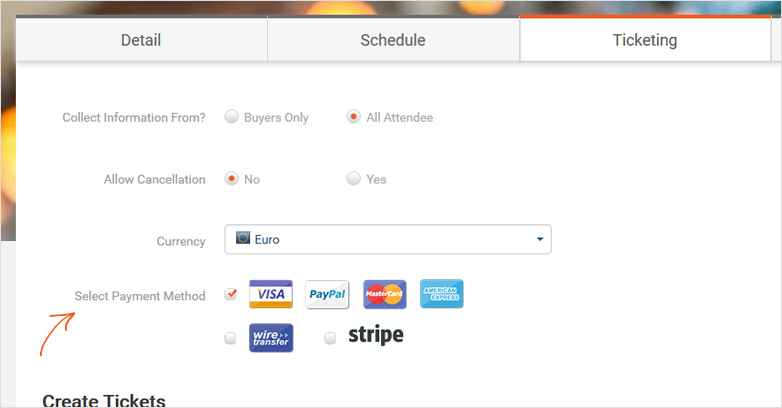
Select the currency of your event
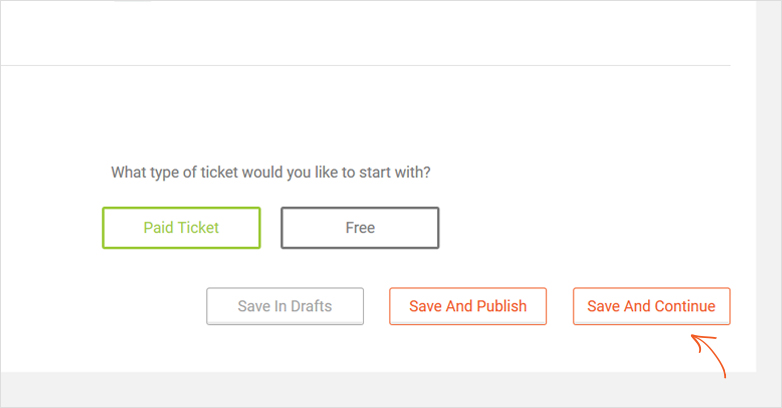
Click on the type of ticket you will like to create (Paid ticket or Free)
Fill the ticket information in the boxes provided (Name of ticket, quantity, Enter Vat and Price)
Repeat step 2 and 3 to create more tickets for an event
Click "Save And Continue" or "Save and publish"
Once done please click "Save and Continue" to move to step 4 which is optional Or publishing directly will make your event LIVE!
Step 4 : Event Optionals
Here you a few options which are optionals for your event.
You can select the checkboxes for the information you would like to collect from your attendees.
Adding your Facebook event will show the Facebook event stats on your event page.
We recomend adding an event cover picture in order to personalize the event page.
Once done please click "Publish" in order to make the event live!
How to set up different payment options for my event?
EventCart allows event organizers to set-up a different payment method for their customers. This makes the ticket payment process easy and convenient for your customers and this is one of our creative ways to ensure you have a well-defined event for all your customers. To set-up different payment options for your attendees, follow the simple steps below:
Choose the payment method you prefer from the options provided by EventCart.
Once done click "Save And Continue" Or "Save and Publish"
How to accept payments by wire transfer, bank invoice, or cash with EventCart's offline payments?
EventCart allows event organizers to collect money offline. Offline Payments is a free module available with EventCart that allows event organizers to keep track of payments via cash and bank transfers. In order to enable your customers to pay offline follow the following steps.
While creating/editing and event Go to "Ticketing” tab
Locate "Select Payment Method" tick the checkbox next to "Wire transfer" and "Cash"
Once done click "Save and Continue" or "Save and Publish"
How to show "Facebook Attendees" on my event page?
EventCart understands the use and importance of social media. So, we created a special social media feature for all our users. This feature enables event organizers to display their facebook attendees on EventCart allowing the customers to see if their friends will be visiting their event. In order to do so follow the simple steps to display your facebook event attendees on your event page.
While creating/editing and event Go to “Optional” tab
Tick the checkbox saying “Add social media links on event page” option.
Add your facebook event id in the text box.
Once done click "Save and Publish"
You can see on your event page in the right bar a section of "Facebook attendees". It may take up to 2 hours to get the attendees from Facebook.
How to customize my event description?
Describing your event beautifully and perfectly is one of the important factors that contributes to the success of the event. We understand the need to have well formatted and outlined texts, so your attendees can read and understand your event description. This enables you to format your texts “In your own way” so you can really sell your event and tell people the most important information they need to know.
While creating/editing and event Go to "Detail” tab
Locate "Event Description" Write a clear, short description that tells people important information about your event. Let your customers know why they shouldn't miss the event. You can customize the styling of text here by using the options provided and also add images.
Once done click "Save and Continue" or "Save and Publish"
How to customize my event cover picture?
EventCart allows you to personalize your event page in many ways. Adding a cover picture to your event page is one of them. You are allowed to use a customized and well-designed event cover photo that will influence and captivate your attendees. To add a customized cover photo follow the steps below.
Locate “Event Cover photo” and Click on “Upload Image”
A popup will appear that will allow you to upload your preferred cover photo and also crop it if needed.
Once done click "Save and Publish"
How to customize my event URL?
EventCart allows event organizers to customize your event URL. This allows your customers to have direct and easy access to your event making your marketing efforts a lot easier. To customize your event URL simply follow the steps below.
While creating/editing and event Go to “Optional” tab
Locate “Your Event Custom URL”.
Type your preferred event URL in the space provided. (You may have to change if that url is already being used by someother event.)
Once done click "Save and Publish"
How to customize my event's refund policy?
While creating/editing your event on EventCart, you can decide to allow/deny your customers to request refunds. EventCart allows event organizers to add their own refund policy if they wish to accept refunds. Refund policy is shown on the event page so that customers understand the refund policy before buying tickets in order to avoid any inconvenience To personaize your refund policiy follow these simple steps:
While creating/editing and event Go to "Ticketing” tab
Locate “Allow Cancellation”
Select “Yes” to enable refund requests.
Enter your refund policy in the textarea below.
Once done click "Save and Continue" or "Save and Publish"
Can I create multiple tickets for a particular event?
Absolutely Yes, EventCart allow you to create different tickets for just a single event. This great and effective feature will enable you to create different ticket value for different attendees of your event. This can be done when you are creating or editing the event. To create multiple tickets for a particular event, follow the steps below:
Select the “ticketing” tab when you are creating/editing your event
Click on the type of ticket you will like to create (Paid ticket or Free)
Fill the ticket information in the boxes provided (Name of ticket, quantity, Enter Vat and Price)
Repeat step 2 and 3 to create more tickets for an event
Click "Save And Continue" or "Save and publish"
How do I add the event schedule?
The schedule of the event is added in the Schedule tab while creating an event.
Please follow the steps below to add schedule.
Select the timezone from the dropdown.
Add Start/end dates and time. This will provide the attendees with the timeframe for the whole event.
Lastly for detailed schedule specifications, use the Event Schedule text box where you can type in what happens during the event in free form.
How to create a webinar?
Creating a webinar on EventCart is easy, quick and free. After signing in with your verified EventCart account, Locate and click on “CREATE AN EVENT” at the top right corner of your EventCart Page. In just 3 easy steps you can GO live and start selling immediately
Video
Step 1: Basic Details
Here you may enter the following.
Event name or title (Keep it short and simple for your guests to remember with ease)
Select event category (A category for your event so your customers can easily search for your event)
Choose event tags (Some event tags making it easy for search engines to locate the event and publically market it)
Summarize your event (A small summary for your event which can be seen also in event search on EventCart)
Upload a suitable picture (A catchy picture to personalize your event)
Describe your event (Details about your event. Give as much information as you like, with our powerful editor you can customize the information also)
Below the location field click "Online Event" (it's a replacement for Event Location)
Once done please click "Save and Continue" to move to step 2
Step 2 : Event Schedule
Here you decide your event timetable. You may let your attendees know the timetable of your event also. With our rich text editor you can customize your timetable also. Please enter the following things in order to proceed.
Select a timezone (Please make sure you selected the correct timezone)
Enter start and end date & time
Provide your event schedule (Let your guests know about your event)
Once done please click "Save and Continue" to move to step 3
Step 3 : Event Ticketing
EventCart allow you to create different tickets for just a single event. This great and effective feature will enable you to create different ticket value for different attendees of your event. This can be done by following the steps below:
Select the currency of your event
Click on the type of ticket you will like to create (Paid ticket or Free)
Fill the ticket information in the boxes provided (Name of ticket, quantity, Enter Vat and Price)
Repeat step 2 and 3 to create more tickets for an event
Click "Save And Continue" or "Save and publish"
Once done please click "Save and Continue" to move to step 4 which is optional Or publishing directly will make your event LIVE!
Step 4 : Event Optionals
Here you have a few options which are optionals for your event.
You can select the checkboxes for the information you would like to collect from your attendees.
Adding your Facebook event will show the Facebook event stats on your event page.
We recomend adding an event cover picture in order to personalize the event page.
Under the heading "Ticket Confirmation Email" click "Yes" to add some custom text into the email that is sent to your attendees. You can add a link to the webinar and other necessary information about your webinar.
Once done please click "Publish" in order to make the event live!

 Still have question? We'll gladly help Contact Us